If you’re planning to install a shed in Florida, one of the most important parts of the permitting process is your site plan.
And here’s the good news:
You don’t need to be an engineer or architect to draw one.
At Sheds of Sarasota, we help customers with this every day. This guide will walk you through exactly how to create a clean, permit-ready site plan that gets approved the first time.
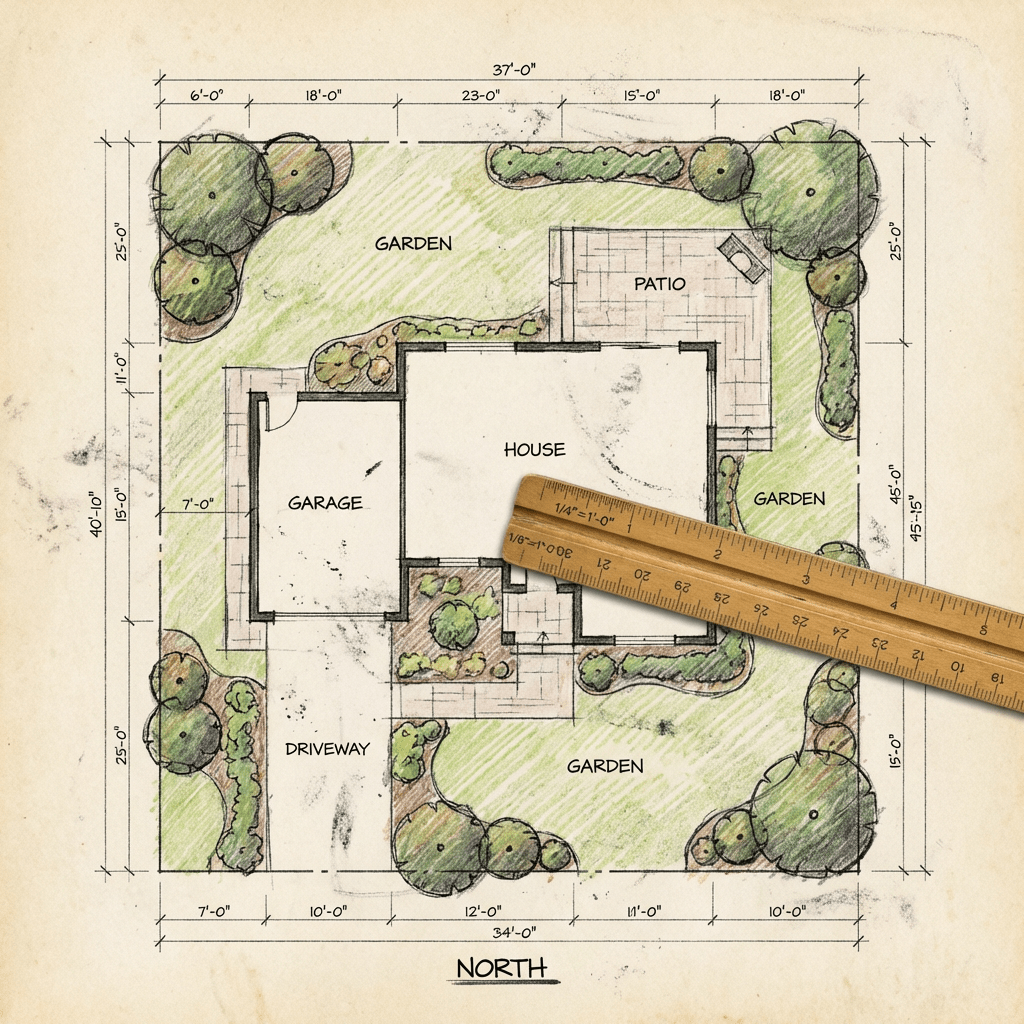
What Is a Site Plan?
A site plan is a simple drawing that shows:
- Your property boundaries
- Existing structures (house, driveway, etc.)
- Where your new shed will go
Think of it as a “bird’s-eye view” of your property.
What You’ll Need Before You Start
Before you draw anything, gather this:
- Property survey (best option)
- Or approximate lot dimensions
- Tape measure or measuring wheel
- Pencil, ruler, and paper (or a simple app)
Pro Tip:
If you have a survey, use it. It makes approvals much faster and easier.
Step 1: Draw Your Property Boundaries
Start by sketching your lot shape.
Include:
- Property lines (front, back, sides)
- Dimensions (length and width of the lot)
Example:
- 150 ft wide
- 385 ft deep
Label each side clearly.
Step 2: Add Existing Structures
Next, draw everything already on your property:
- House
- Driveway
- Fence (if applicable)
- Septic or well (if known)
Important:
Include approximate measurements from structures to property lines.
Step 3: Draw the Shed in the Correct Location
Now add your shed.
Label:
- Size (example: 10×20 shed)
- Shape and orientation (which direction it faces)
Then measure and mark:
- Distance from the back property line
- Distance from side property lines
- Distance from the house
Step 4: Show Setbacks Clearly
This is where most people mess up.
You must show that your shed meets setback requirements (distance from property lines).
Example:
- 5 ft from side property line
- 10 ft from rear property line
Draw and label these distances clearly.
Step 5: Add Labels and Notes
Make your plan easy for the county to understand.
Include:
- “Proposed Shed Location”
- Shed size (10×20, 10×16, etc.)
- Property address
- Your name
Optional but helpful:
- North arrow (just draw an arrow and label “N”)
Step 6: Keep It Clean and Readable
Your plan doesn’t need to be fancy—it needs to be clear.
✔ Straight lines
✔ Clear labels
✔ Easy-to-read measurements
Avoid:
- Scribbles
- Missing dimensions
- Guessing on placement
Example Layout (Simple Version)
Here’s what a basic site plan includes:
- Rectangle = property boundary
- Smaller rectangle = house
- Another rectangle = shed
- Lines with measurements showing distances
That’s it.
Common Mistakes That Get Plans Rejected
Avoid these and you’ll save yourself time:
❌ No measurements
❌ Shed too close to property line
❌ No property dimensions
❌ Placement doesn’t match actual install location
❌ Illegible drawing
Do You Need It to Be Exact?
It needs to be accurate, not perfect.
But here’s the key:
👉 The shed must be placed exactly where the plan shows
If not, you could fail inspection and have to move it.
Want Us to Help?
At Sheds of Sarasota, we help customers:
- Draw site plans
- Choose the best shed placement
- Make sure everything meets local requirements
We can even help you visualize your layout before you buy.
Start Your Shed the Right Way
📍 6502 14th Street West, Bradenton, FL
📞 941-462-9184
🌐 http://www.shedsofsarasota.com
📧 shedsofsarasota@gmail.com
Final Thought
A good site plan does one thing:
It makes your shed project simple.
No delays. No surprises. No failed inspections.
Just a smooth process from permit to install.
Coming Next in the Series:
“Best Foundations for Sheds in Florida (Gravel vs Concrete vs Dirt)”

Leave a comment